Wall macramé is a decorative feature that has won the hearts of many decorators. This is because in addition to being a handcrafted work, it also offers personality to the environment. After all, each resident chooses the colors, shape and design of the object that will decorate the wall. With that in mind, we created this article with step-by-step instructions on wall macramé so you can make your own!
Crafts are not always the cheapest decoration option on the market. Therefore, many people prefer to learn how to make their own wall macramé. This way, the activity becomes a hobby, it is possible to create an emotional bond with the object and still have a unique piece. Furthermore, it can become an excellent source of income, right?
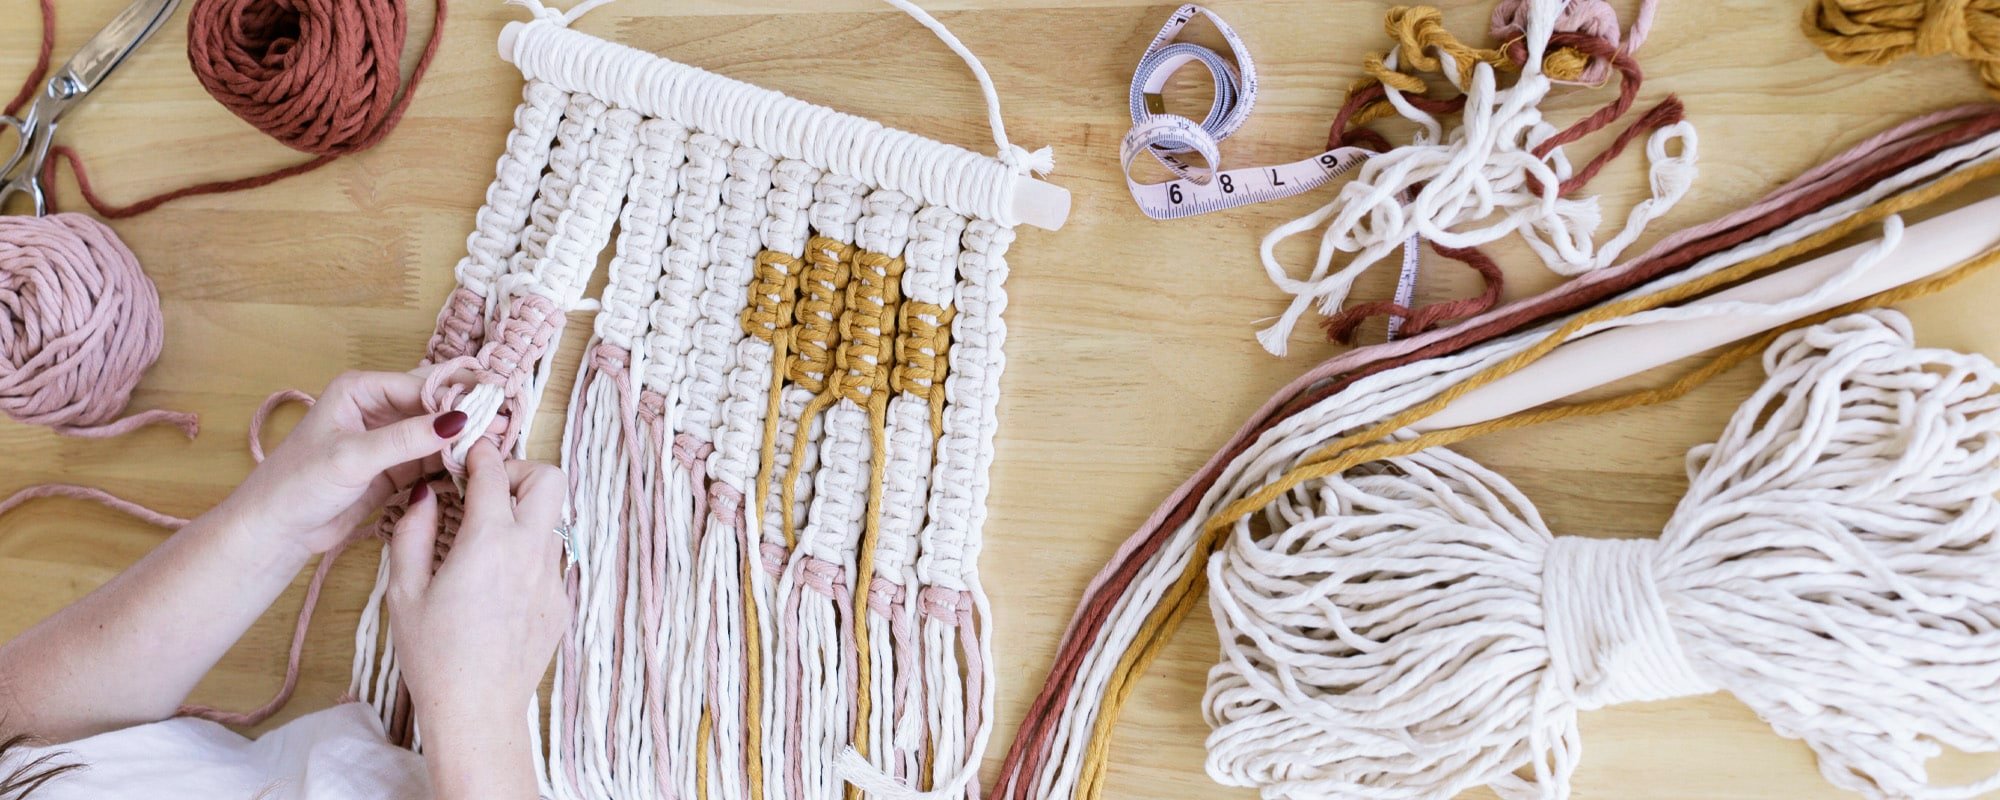
So, stay tuned for the images showing step-by-step instructions for wall macramé and follow all the instructions exactly. As we know, there are several knots that form different designs in macramé. So, you will see a tutorial with the easiest knots to make your wall macramé. Furthermore, to make the decoration even more sophisticated, it is worth mixing more than one model.
Materials needed
Before starting to think about the design that will be formed and the difficulty of execution, it is necessary to separate the materials that are used. The advantage of macramé is that it is a decorative item that does not require expensive materials or difficult-to-use tools.
As a result, you may already have all the necessary materials at home, do you want to see? Are they:
- Scissors
- Corda
- Measuring tape
These are the basic materials. However, depending on your inspiration and the model chosen, this list often includes a wooden handle, metal hoops, rings and buckles. Furthermore, to give different textures to the macramé wall, use wool, linen, cotton, hemp and even leather. And speaking of rope…
- Enjoy and follow us on Google News to find out everything about Fashion, Beauty, Celebrities, Décor and much more. Just click here, then on the little star 🌟 in the News.
What is the best rope for wall macramé?
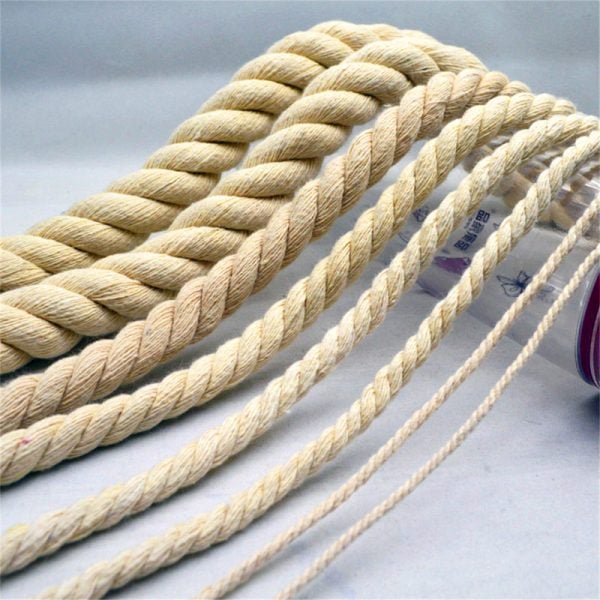
Whether wall-mounted or any other model, the best rope for making macramé is cotton. This is due to the softness and flexibility of the material, which makes the rope much easier to handle. Furthermore, it is durable, as it does not stretch over time.
When buying yarn, it is common to find a variety with different thicknesses. Therefore, always order 3-ply wire measuring 4-6mm. This material can be found in online stores and also in craft stores.
Here, it is worth highlighting that it is not recommended to make macramé with threads that are used in crochet or knitting. This is because they are usually very thin. As a result, the knot made will be smaller than planned.
How to make wall macramé
Now that you’ve separated the materials to make your wall macramé, it’s time to learn how to make the basic knotting techniques. First of all, it is necessary to emphasize that for the final work to be perfect, it takes practice. Only in this way can the techniques be highly mastered.
Furthermore, using the common nodes that we will teach you below, it will be much easier to create other more complex models in the future. To do this, we separate the models into four categories: assembly nodes, square nodes, coupling nodes and junction nodes.
- Check out: Leopard crochet: how to do it, with graphics and step-by-step instructions for a bag and hairband!
Wall macramé step by step
- Step 1: Mounting Knot or Lark’s Head Knot
– Measure the rope and cut a piece. Then fold the rope in half so that the ends are together;
– Then, take the loop and pass it over the wooden rod until you reach the back;
– With the loop on the back of the rod, pass the ends of the ropes through it;
– Finally, pull the ends down until the knot is tightened. Remember that they need to be on the same level.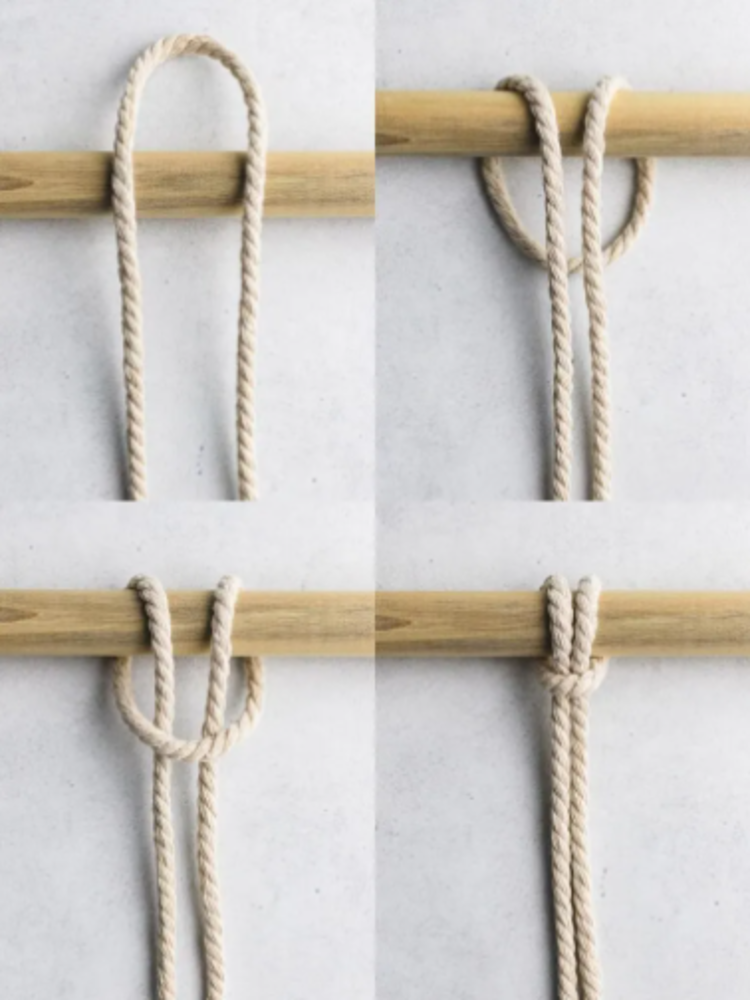
- Step 2: Half Square Knot
For this step you will need two lark head knots. The two outer ropes will be called working ropes and the middle ones will be the filler ropes.
– Pass the left working rope over the filling ropes and under the right working rope;
– Then, take the right working rope, pass it under the filling ropes and over the left working rope;
– Finally, just tighten the knot.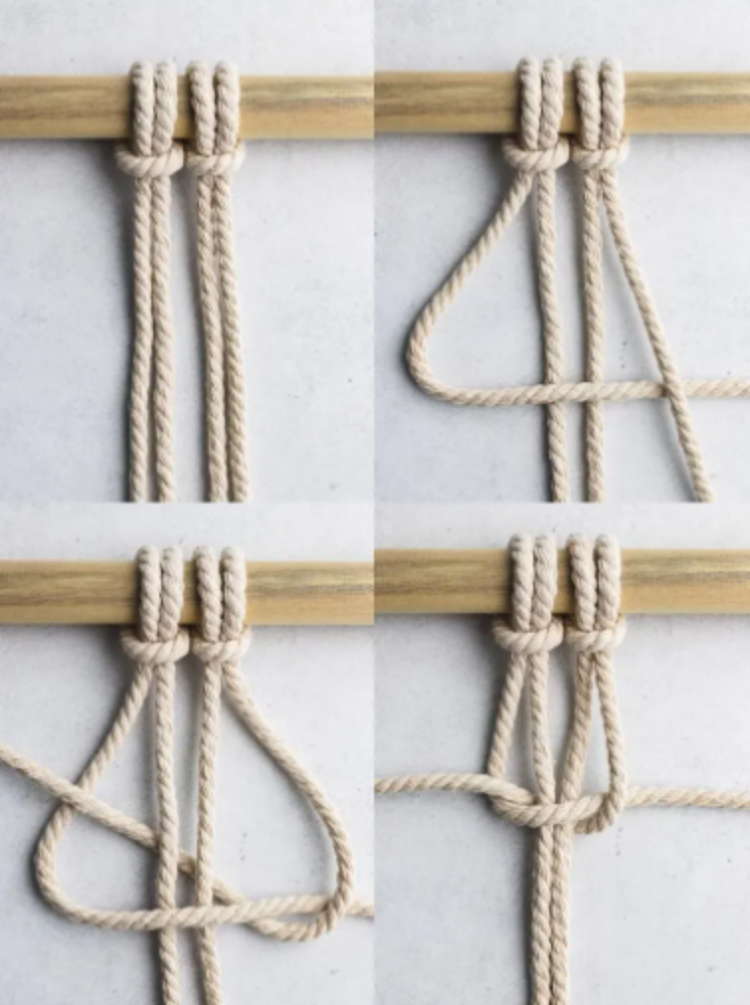
- Step 3: Square Knot
The square knot is made through two half square knots. In other words, just make a half square knot twice. One will be turned to the right and the other to the left.

- Step 4: Half Horizontal Double Hitch
This step is a variant of a knot that can be made in wall macramé. However, it is a little more difficult than the others already presented.
The knot called a horizontal double half hitch is formed by an entire row with a double half hitch. To do this, you will only need one color from the working one, where two half knots will be made from each double horizontal knot.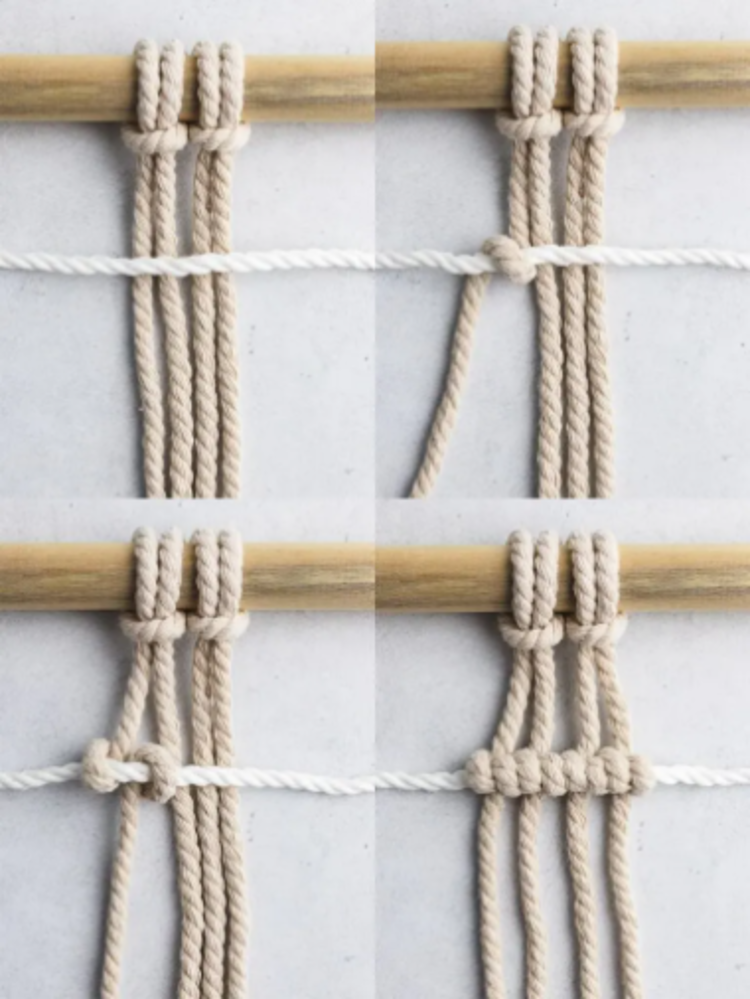
- Step 5: Double Diagonal Half Hitch Knot
If you managed to do the horizontal double half knot, you will definitely be able to do this model too. After all, the only difference between them is that ours is positioned diagonally and not horizontally.
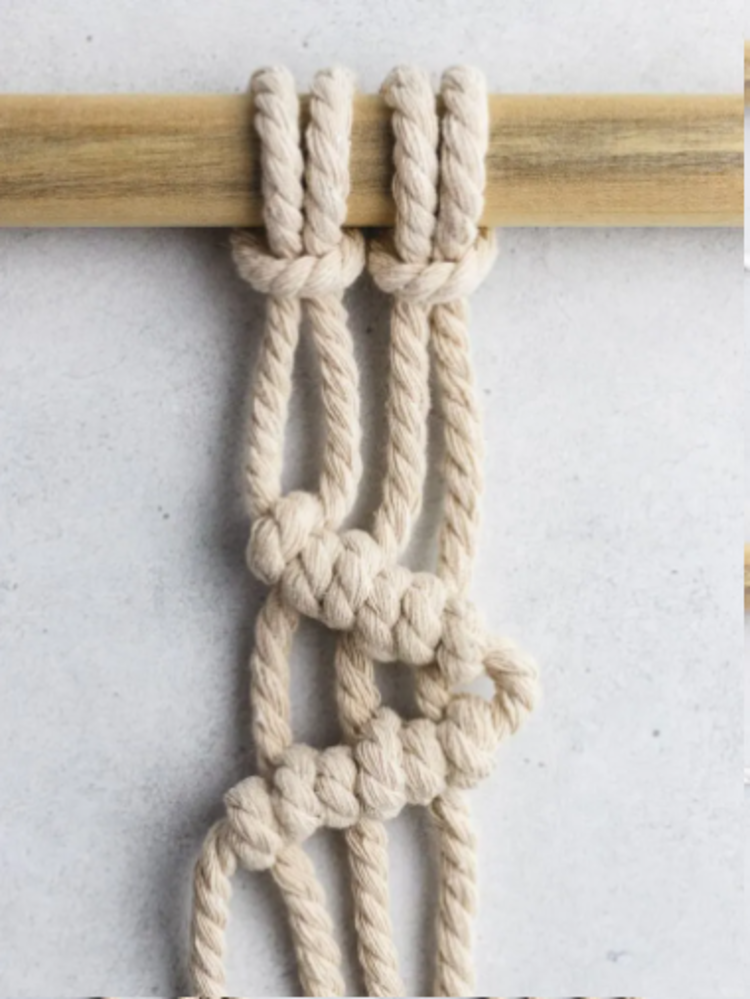
- Step 6: Vertical Double Semi Hitch
Basically, a vertical half knot will be made on the working rope.
– Then, using the same rope, simply make another knot in the filling rope;
– Finally, just repeat the process using another rope on the other working rope.
- Step 7: Wrapped Knot
This type of knot is used to secure a group with several ropes. This is generally done at the beginning or end of the wall macramé.
– Firstly, you need a large piece of rope that you will no longer use for craft work;
– Then, just gather all the ropes that will be attached.
– Finally, simply wrap the working rope around the grouped ropes. Now just pass the working cable through the loop and pull to secure.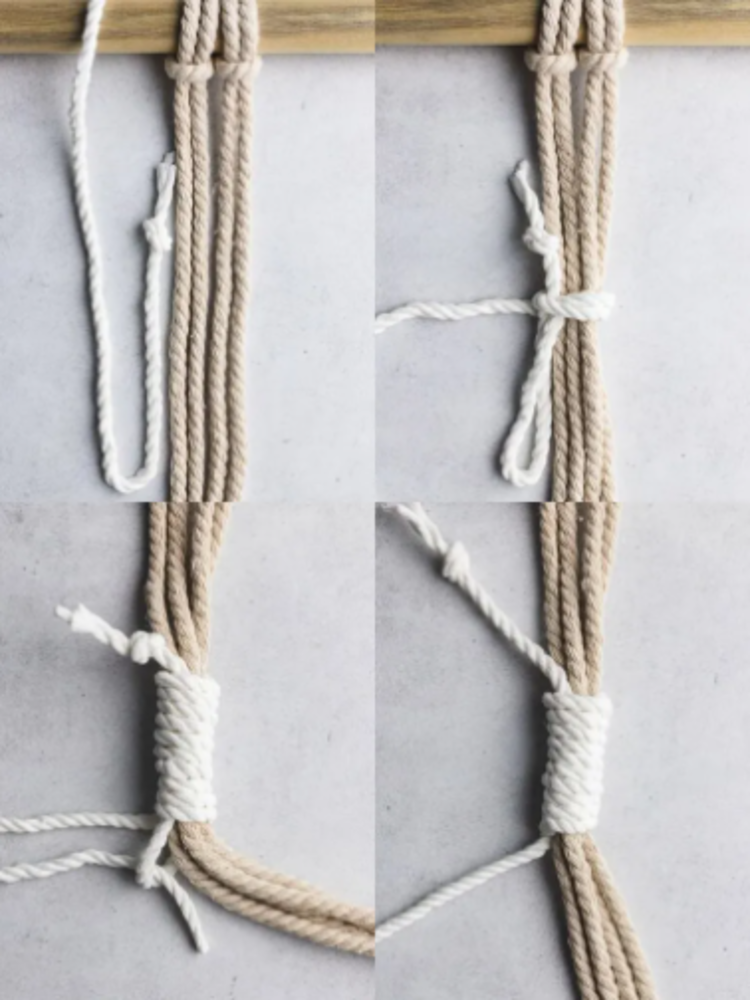
How to make fringe on wall macramé?
This is a frequently used resource and requested in step-by-step wall macramé to give a special charm to the craft. To do this, simply cut the ropes to the desired size and use a wire brush to fray the rope fibers. Finally, if some are out of length, just color them.
- Have you ever thought about using fringes on your clothes too? So, check out our special on custom men’s abadás: 74 photos and videos with step by step + ideas to inspire!
What is the ideal rod size?
Everything will depend on the size of your decoration project. Furthermore, the rope that will be used also counts a lot. After all, the shorter the rope, the thinner the knot. As a result, if the rod is too long, the knots will disappear and your macramé wall will look disproportionate.
How much rope do I need to buy to make a macramé wall?
This is another question, it also depends on the size of the work you want and also the number of nodes in your project. After all, the knot decreases considerably with the length of the rope.
However, to give you an idea, it is recommended to buy five times more rope than the original size of the project. With this, there will be no unforeseen events and you can even add a fringe at the end of the project to make it look different.
Alane Dias, Isabelle Nogueira and Lucas Henrique are on the 19th Paredão! On Tuesday, another one of them says goodbye to the house; Which brother do you think will leave the program? Participate in the vote in the Fashion Bubbles poll and check partial results in real time!

Sign up for our newsletter and stay up to date with exclusive news
that can transform your routine!
Warning: Undefined array key "title" in /home/storelat/public_html/wp-content/plugins/link-whisper-premium/templates/frontend/related-posts.php on line 12
Warning: Undefined array key "title_tag" in /home/storelat/public_html/wp-content/plugins/link-whisper-premium/templates/frontend/related-posts.php on line 13