How to Master the Black Smoky Eye for Your Next Party: The Ultimate Guide
Let’s face it—there’s nothing more dramatic and captivating than a black smoky eye. Whether you’re preparing for a night out with friends, attending a glamorous party, or getting ready for a special event, the black smoky eye is the perfect makeup look to turn heads and add instant allure. The deep, smoldering effect of a well-executed black smoky eye enhances your natural beauty and makes your eyes pop, creating an unforgettable look.
But here’s the thing: mastering a black smoky eye can seem intimidating, especially if you’ve never tried it before. It requires precision, technique, and the right products to ensure it doesn’t look too harsh or messy. Lucky for you, I’m here to guide you through everything you need to know to perfect this iconic look and make sure you’re party-ready.
In this article, I’ll show you how to create the perfect black smoky eye, step by step, while sharing pro tips, product recommendations, and common mistakes to avoid. By the time you’re done reading, you’ll be confident enough to rock a bold, smoky look for any party or event, and trust me, you’ll love how it makes you feel. Ready to dive into the world of smoky eyes? Let’s get started!
1. Prep Your Eyes for Perfection
Before you start applying any makeup, it’s essential to prepare your eyes to ensure that your black smoky eye lasts all night and doesn’t crease. Preparation is key, especially for creating a smooth, even canvas.
- Start with an Eye Primer: Using an eye primer is an absolute must to keep your eyeshadow in place. Eye primer acts as a base, preventing your eyeshadow from creasing or fading, and it enhances the intensity of the colors. Choose a long-lasting, oil-free primer for a more durable finish.
- Use Concealer to Clean Up: Apply a small amount of concealer around your eyes to neutralize any discoloration, such as dark circles or veins. This will help your makeup go on smoothly and allow the smoky eye to pop. Don’t forget to blend it well into the skin for a flawless finish.
- Set with Powder: Once the primer and concealer are applied, lightly set them with a translucent setting powder. This will prevent any creasing and keep the eye area matte, which is especially important if you have oily skin.
Why It Works: Properly prepping the eye area ensures a smooth surface for blending and helps the makeup last throughout the night.
2. Choosing the Right Tools for a Flawless Black Smoky Eye
The right makeup tools are essential when creating a black smoky eye, as they help you blend and smudge the shadows to create the signature smoky effect. Here are some of the must-have tools you’ll need:
- Flat Eyeshadow Brush: A flat eyeshadow brush will help you pack on the product and apply a strong layer of pigment to your eyelids. This brush is especially helpful for applying the black eyeshadow.
- Blending Brush: The blending brush is the star of the show when it comes to smoky eyes. Choose a fluffy, soft brush that allows you to blend the eyeshadow seamlessly into your crease and beyond. The key to a successful smoky eye is perfect blending, so don’t skimp on this tool.
- Smudge Brush or Pencil Brush: A smudge brush is essential for blending eyeliner or eyeshadow along your lash line, giving you that sultry, smokey look. This brush helps soften harsh lines and allows you to create that signature smudged effect that defines the smoky eye.
- Angled Brush: An angled brush is useful for applying eyeshadow along the lower lash line, creating a soft, smudged line that completes the smoky effect. It also helps with precision if you’re using eyeliner.
Why It Works: The right tools allow you to achieve smooth, well-blended eyeshadow without harsh lines or patches. They give you control over the application process.
3. Create the Base for Your Smoky Eye Look
Now that your eyes are prepped and your tools are ready, let’s get started with the base of your smoky eye.
- Step 1: Apply a Base Eyeshadow Shade: Start by applying a neutral or nude eyeshadow all over your eyelid. This will serve as your base and help the black eyeshadow blend more easily. You can choose a matte beige or a soft taupe shade depending on your skin tone.
- Step 2: Build Up the Smoky Shadow: Using a flat eyeshadow brush, take a matte or satin black eyeshadow and start applying it to the eyelid, focusing on the outer corner and gradually blending it inward. Make sure you don’t apply the black shadow all the way to the inner corner of the eye, as you want to create depth and dimension. Build up the intensity of the black eyeshadow slowly, so it doesn’t become too harsh.
- Step 3: Blend, Blend, Blend: This is where the magic happens. Use a fluffy blending brush to soften the black shadow, blending it into your crease and outward toward your brow bone. Don’t be afraid to blend for several minutes—this is the key to achieving that smoldering, seamless smoky look. You want the eyeshadow to gradually fade from dark at the lash line to lighter near the crease.
Why It Works: Building up the color gradually and blending well creates that sultry, smoky effect that’s the signature of this look.
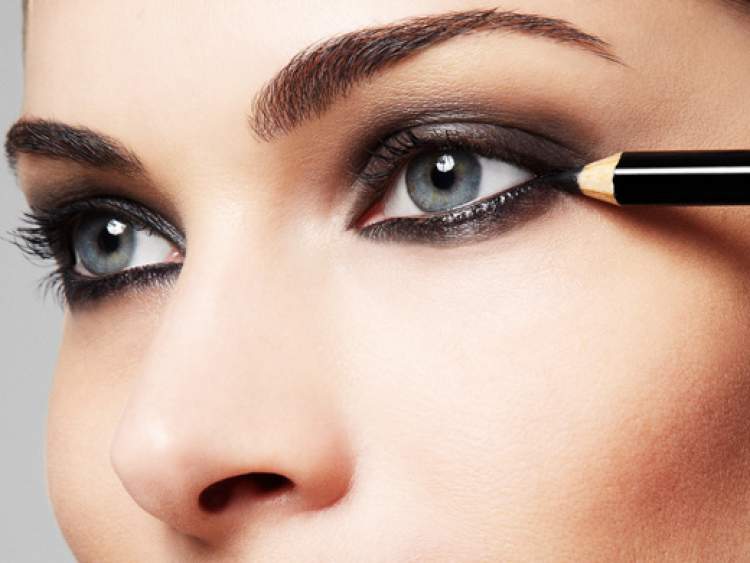
4. Define Your Lashes with Eyeliner
Eyeliner plays an important role in making your smoky eye stand out. It defines the eyes and helps create a stronger contrast with the black eyeshadow. Here’s how to apply it effectively:
- Step 1: Apply a Black Liner to the Upper Lash Line: Use a gel or pencil eyeliner to line your upper lash line. Make sure to apply the eyeliner as close to the lashes as possible for a natural, seamless look. You can choose to create a winged liner if you want a more dramatic effect.
- Step 2: Smudge the Liner: After applying the eyeliner, take a smudge brush and gently blend the eyeliner into the black eyeshadow on your eyelids. This will create a soft, smoky transition from the eyeliner to the eyeshadow, preventing any harsh lines.
- Step 3: Line the Lower Lash Line: Line the lower lash line with the same black eyeliner, and then smudge it out with a smudge brush to achieve a soft, smoky effect. Don’t be afraid to build up the intensity of the eyeliner along the lower lash line, as this will add drama to your overall look.
Why It Works: Smudging the eyeliner into the eyeshadow creates a seamless, smoky transition and ensures the liner doesn’t look harsh or out of place.
5. Highlight the Inner Corners and Brow Bone
To add balance to your black smoky eye, it’s important to brighten up certain areas of the eye.
- Step 1: Apply a Light Shade to the Inner Corner: Use a light, shimmery eyeshadow to highlight the inner corners of your eyes. This will open up your eyes and provide contrast against the dark smoky eye. A champagne or pale gold shade works best for this purpose.
- Step 2: Illuminate the Brow Bone: Lightly apply a highlighter or matte cream shade to your brow bone to lift your eyes and give them an overall more polished look.
Why It Works: Adding highlights to the inner corners and brow bone helps to brighten and lift the eyes, preventing the black smoky eye from looking too heavy or overwhelming.
6. Finish with Luscious Lashes
Lashes are an essential part of a smoky eye. Full, voluminous lashes will give your eyes the final touch they need to complete the look.
- Step 1: Apply Mascara: Start by applying a generous coat of waterproof mascara to both your upper and lower lashes. Make sure to coat your lashes from root to tip to create volume and length.
- Step 2: Add False Lashes (Optional): For a more dramatic, party-ready look, consider applying a set of false lashes. Choose lashes that are thick, voluminous, and slightly longer at the outer corners for a cat-eye effect.
Why It Works: Lashes open up the eyes and make the smoky eye look even more intense and sultry. Full lashes add extra glamour to your overall appearance.
Common Mistakes to Avoid When Creating a Black Smoky Eye
Creating a black smoky eye can be tricky if you’re not careful, and there are a few common mistakes that can ruin your look. Here’s how to avoid them:
- Using Too Much Product: Less is more when it comes to smoky eyes. Applying too much black eyeshadow or eyeliner at once can make the look feel heavy and harsh. Build up the product gradually for the best results.
- Not Blending Enough: The key to a great smoky eye is blending. If you don’t blend the eyeshadow properly, you’ll end up with harsh lines and a patchy look. Take your time blending to achieve that smooth, seamless finish.
- Skipping Primer: Without primer, your eyeshadow may crease or fade, especially in humid conditions. Always start with an eye primer to ensure your smoky eye lasts all night.
- Overdoing the Lower Lash Line: While defining the lower lash line is important for a smoky eye, avoid going too heavy on it. Too much dark eyeliner on the lower lash line can make your eyes look smaller.
FAQ:
Q: How do I make sure my black smoky eye lasts all night?
A: To ensure your smoky eye lasts, always start with an eye primer, use long-wearing and waterproof products, and set your eyeshadow with a setting spray. This will lock everything in place and prevent creasing or fading.
Q: Can I wear a black smoky eye for a daytime look?
A: While the black smoky eye is typically associated with evening or party makeup, you can create a softer version by using less black eyeshadow and opting for neutral shades. This makes the look more wearable for day-to-day activities.
Q: Should I use matte or shimmer shadows for a black smoky eye?
A: Matte black eyeshadow works best for the main lid to create a smoldering effect, but you can use shimmery shades for the inner corners and brow bone to highlight and brighten the look.
Ready to Elevate Your Makeup Game?
With these tips, techniques, and product recommendations, you’re now equipped to create the perfect black smoky eye for your next party or special event. Don’t let the fear of complicated application hold you back—just follow the steps, and you’ll be able to master this dramatic look effortlessly.
For more expert makeup tips, tricks, and exclusive beauty content, be sure to sign up for our newsletter. You’ll receive regular updates and insider secrets on how to keep your makeup flawless and fun, no matter the occasion!

Sign up for our newsletter and stay up to date with exclusive news
that can transform your routine!
Warning: Undefined array key "title" in /home/storelat/public_html/wp-content/plugins/link-whisper-premium/templates/frontend/related-posts.php on line 12
Warning: Undefined array key "title_tag" in /home/storelat/public_html/wp-content/plugins/link-whisper-premium/templates/frontend/related-posts.php on line 13