Carnival is one of the most anticipated parties of the year, after all, on this day we let life take us to the beat of the drums with lots of joy and willingness.
Decorated Nails Course
This colorful and glamorous day is ideal for us to feel comfortable with our look and for those who love colors, but don’t have much courage to mix them in everyday life, this is the right time. In addition to innovating the look, the nails also come to life with cheerful colors and fun designs.
Learn how to do decorated nails step by step
Enjoy the tutorials and enjoy Carnival with these super easy to do nails that we prepared for you!!


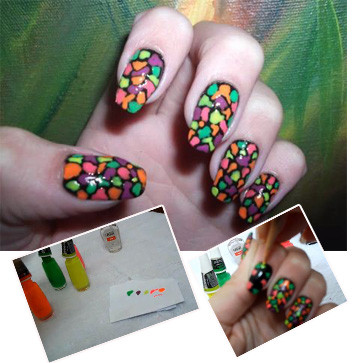
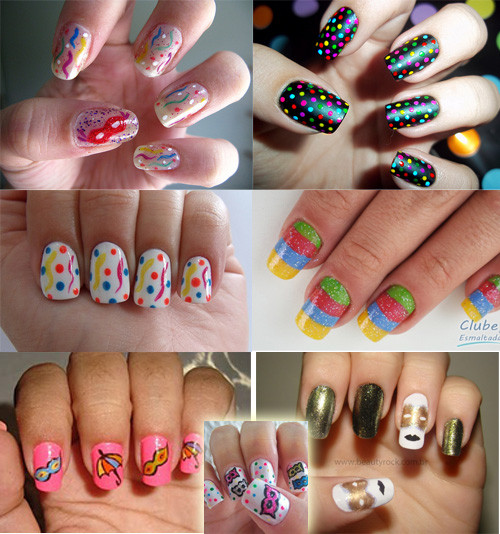
Nails decorated for carnival – Model 1
Materials used: black, green, purple, yellow, pink and orange nail polishes. Paper to drip the nail polish and toothpick to clean excess nail polish (the thickest one).
Nail Art: 6 models of decorated nails step by step
Nails decorated for the 2014 Cup
- Polish all your nails black;
- Before you start making the dots on your nail, remember to leave space between them so that the black outline appears between them.
- With the green nail polish, drop a little ball onto the nail and gently smudge it to the sides. In the photo above, notice that three green dots were made in different corners of the nail, but you can do as many and wherever you want. You also decide the size of the balls. You can make them all the same size or alternate them.
- Do the same process with the other nail polish colors, always leaving space between the dots.
- Wait for it to dry and finish with an extra shine.
Nails decorated with tutorials and videos
Nails decorated for carnival step by step in the video by Lika Sous
(youtube
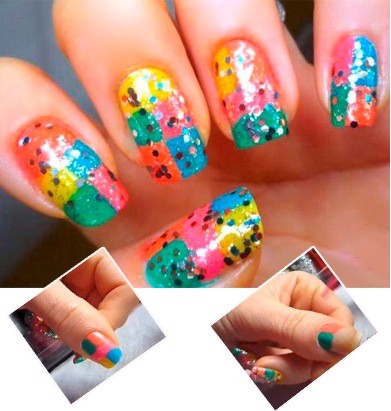
Nails decorated for carnival – Model 2
Materials used: orange, yellow, blue, green and pink nail polishes. Gold and colored glitter (the latter must have particles larger than gold).
Nails 2014: Discover the trends
Nails decorated with gold thread
- Start by making a small square with the green nail polish at the base of the nail. Of course it won’t be a perfect square, it will be a bit irregular.
- With the orange nail polish, make another square next to the green one, so that only the two colors are side by side. See the photo above.
- Now with the pink nail polish make a stripe on top of the squares that were made.
- With the blue nail polish, make another square on top of the pink stripe.
- And with the yellow nail polish make another square next to the blue square.
- Wait for it to dry and apply two layers of gold glitter over the entire nail.
- Wait for it to dry and apply a layer of colored glitter.
Nails decorated with pepper
Nails decorated for Carnival step by step in the video by Leila Ramos
(youtube
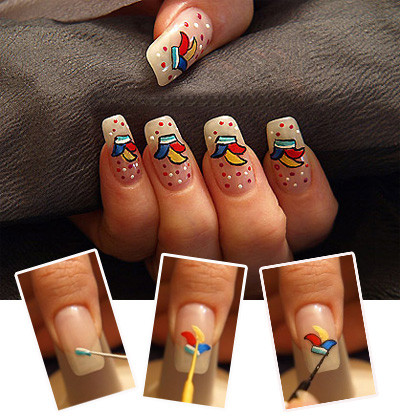
Nails decorated for carnival – Model 3
Materials used: white, blue, red, brown and purple nail polishes. To make it easier, it would be better to use a fine brush.
4 French nails for you to learn
3D nails step by step
- With the white and blue nail polish, make two small stripes diagonally and one on top of the other a little below the tip of the nail.
- Take the red nail polish and make a small smudge (in the style of a beanie) on the tip of the white stripe.
- At the other end of the white band, make the same shape (as the hat) with blue nail polish.
- In the middle of the two hats, make another one with yellow nail polish.
- With the brown nail polish, outline the two small bands that were made at the beginning (the white and blue) and the three little hats.
- With the white, purple and red nail polish, make dots all over the nail (except on top of the design that was made), as in the photo above.
- Wait for it to dry and finish with an extra shine.
Matte polka dot nails: Do it yourself
Watch the explanatory video
(youtube
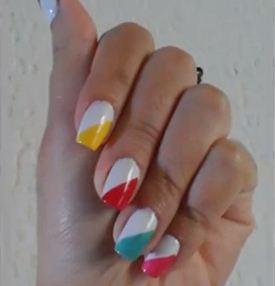
Nails decorated for carnival – Model 4
For those who like the “least arrived” color, there is also the option of doing a simpler nail, but still showing joy.
Inverted French nails
Materials used: white, purple, red, blue and yellow nail polishes.
Decorated nails, join this trend too!
- Polish all your nails with white nail polish. If desired, apply two layers.
- Once dry, choose a nail polish color and make a diagonal stripe down the middle of the nail.
- Repeat this process on all other nails, but with different nail polish colors.
- Once dry, finish with an extra shine.
- Tip: if you can’t make the stripe straight, after the white nail polish dries, use adhesive tape to help and make the stripe. Once dry, remove the tape.
- If you prefer not to use the tape and still encounter difficulties, make the strip little by little until you reach the desired size.
5 Myths about Nail Polish
Nails decorated for carnival step by step in the video by Beatriz Medeiros
(youtube
Did you like it? Want more ideas?

Sign up for our newsletter and stay up to date with exclusive news
that can transform your routine!
Warning: Undefined array key "title" in /home/storelat/public_html/wp-content/plugins/link-whisper-premium/templates/frontend/related-posts.php on line 12
Warning: Undefined array key "title_tag" in /home/storelat/public_html/wp-content/plugins/link-whisper-premium/templates/frontend/related-posts.php on line 13