Are you passionate about music? Do you play any instrument? Can’t stand seeing a do-re-mi-fa-sol-la-si that already gets excited? Oh…and he loves doing things nails?? Then you are in the right place, because in this nail art we will teach you how to apply musical symbols to your nails.
Nail Art: 6 models of decorated nails step by step
These nails look super beautiful and are much more suitable for those who are part of this musical universe, after all, not everyone has the pleasure of singing a song around.
Nails decorated step by step
If you play an organ or keyboard, for example, it becomes even more elegant, with your fingers moving all the time, showing everyone the charm of your hands.
Learn how to protect and care for your cuticles
But, if you don’t understand music, but find everything very beautiful and elegant, and are always up to date with the latest nail art, there’s nothing stopping you from getting your nails done in a musical style. Enjoy!!!
Find out everything about gel nails
 Musical nail art step by step
For this nail you will use white nail polish and black acrylic nail paint. But, instead of paint, you can use black nail polish. You will also need a fine brush to make the stripes and a baller or clamp to make the dots.
The 14 most coveted nail polishes that are hits on TV

1. Polish your entire nail white;
On one of the nails you want:
2. Using a thin brush, make three horizontal stripes on the nail, starting at the tip of the nail, one below the other, with small spaces between them. Do this on all your nails to make it easier when you come back to do the designs.
3. Using a fine brush and black paint or enamel, we will draw the treble clef symbol. To make things easier, under the third stripe that was made in the previous step, start by drawing a spiral. At the end of the spiral (at the tip), go up the line forming an “S” and go down a straight line passing through the middle of the spiral down to the end of the stripes and curve the tip upwards to the second stripe. (see photo above).
Permanent enamel
On another nail:
4. Now let’s move on to another design on another nail. On the chosen nail, make a small black dot between the first and second stripes, it doesn’t matter if it goes a little higher or lower.
5. Make another ball on the third stripe, so that the stripe cuts the ball in half.
6. Now, in the right corner of each of the balls, with black paint or nail polish, make the number 1 in reverse. The curve at the tip of number 1 must be outside the ball. (see photo above).
Porcelain nails step by step
On another nail:
8. Using nail polish or black paint, make the same dots as in step 4, but on opposite sides.
9. In the right corner of each ball, still black, draw a vertical stripe and connect them with another horizontal stripe (like a beam).
10. Repeat these designs if desired on the remaining nails or leave them just white.
11. Finish with an extra shine.
Nails decorated with flowers
Follow the step by step of this nail art in the video below from iEsmalte
 Another nail art idea for you to copy
For this nail art you will need black nail polish or acrylic paint, white nail polish, adhesive tape, baller or clip to make the dots and a thin brush.
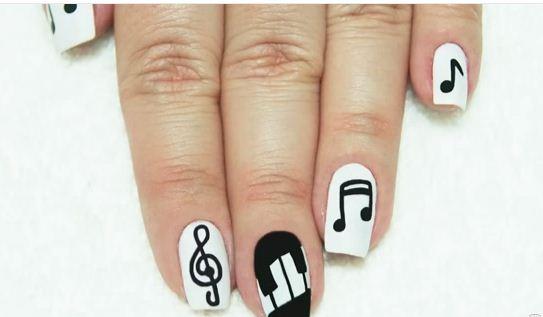
1. Polish your middle finger nail black and the remaining nails with white nail polish.
Choose a nail:
2. Make a black dot in the top corner of the nail (but leave a small space in the corner).
3. Now in the right corner of the ball, upwards, make the number 1 in reverse.
Nails decorated for carnival
Choose another nail:
4. Using black, make a dot in the top corner of the nail and make another dot in the other corner of the nail, however, a little further down.
5. Now, as if you were going to do number 1 again, but just make a straight line in each right corner of the balls and join these lines at the top, with another horizontal line (as if it were a beam). Make another horizontal stripe underneath the first. Repeat this process on another nail.
Nails decorated with gold thread
On the enameled nail up close:
6. Stick two adhesive tapes, one on the tip of the nail transversely and the other on the base of the nail also transversely.
7. Paint the middle part with white nail polish. Wait for it to dry and remove the tapes.
8. Now, using a thin brush and black nail polish, make three vertical stripes with spaces between them. Notice that three natural white keys were formed.
9. Now let’s do the flat/sharp keys. Using black, draw the shape of a beam on top of the two stripes in the corner, so that the stripe drawn previously is in the middle of the beam.
Nails decorated with pepper
Choose another nail:
10. draw the treble clef, as explained in step 3 on the first nail at the beginning of the post.
11. Finalize is beautiful nail art with extra shine.
Nails decorated for the 2014 Cup
See the step by step in the video below by Gaby Nail art
(youtube
See some more musical nail art models

Images: Reproduction/Internet.

Sign up for our newsletter and stay up to date with exclusive news
that can transform your routine!
Warning: Undefined array key "title" in /home/storelat/public_html/wp-content/plugins/link-whisper-premium/templates/frontend/related-posts.php on line 12
Warning: Undefined array key "title_tag" in /home/storelat/public_html/wp-content/plugins/link-whisper-premium/templates/frontend/related-posts.php on line 13

