Does anyone still doubt the wonders that good makeup can do for female beauty?
I don’t think so, do you?
Among the many possibilities of makeup, we can mention highlighting, highlighting or even correcting some skin problems or imperfections, or even thinning.
Yes, and that is exactly what we will show you now, how to slim your face using makeup with a light and dark base, that is, through a technique called light and shadow, in which the volumes of the face are worked on. Want to learn?

It’s worth knowing that when taking a photo, the face, which is three-dimensional, appears two-dimensional, which explains the fact that some people change so much in photographs, or even appear chubbier than they really are, believe me, it’s not always photoshop’s fault. .
See: Tricks to make you more photogenic
More: Makeup to look good in photos
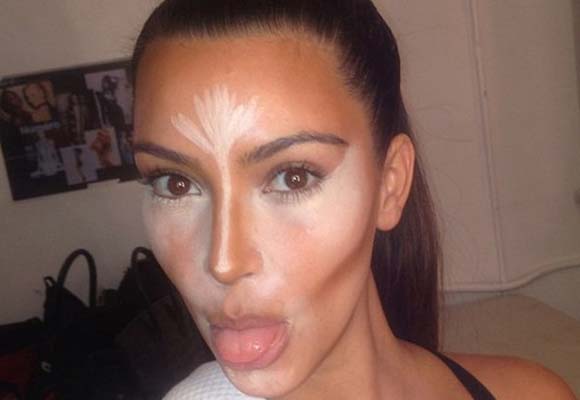
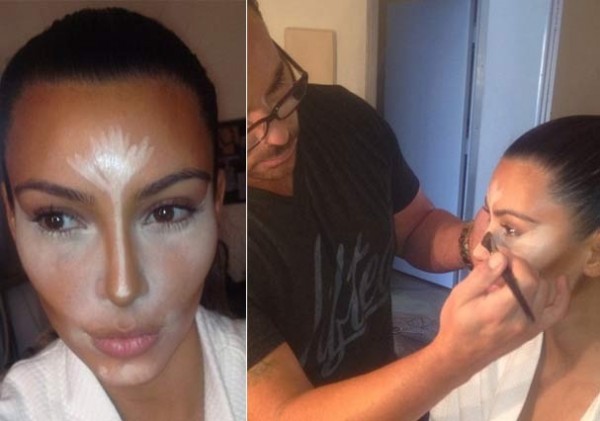
The fact is that leaving theory aside, the truth is that this makeup technique makes anyone look good in the photo, so much so that the great promoter of the technique is the muse Kim Kardashian, who every now and then teaches on a social network the step by step to achieve the same effect. So, do you want to learn? Write down the step by step:

First of all, it’s worth knowing that you can start this makeup in two ways, either with your skin ready, with a thin layer of foundation, or with a layer of BB Cream.
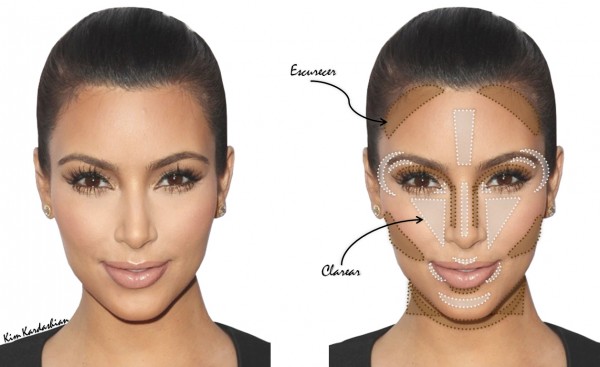
To do this technique you need to have two shades of foundation, one darker than your skin, and one lighter. First use the dark base to mark the areas that need depth.
Discover: 6 tips for your foundation not to be noticed
Tune to Bochecha

The first step is to mark the cheeks, but remember that these markings must follow the natural design of the face, that is, the line must be between the zygomatic bone – the cheekbone – and the jaw bone.
Draw a diagonal line line, from the middle of the cheek to the hairline, towards the ear. Just be careful not to get too close to the mouth and nose. The line must also be very symmetrical, that is, on one side and the other, the same height and the same size.
Now, with this effect, you will give the impression of a thinner and more elongated face. But be careful, anyone who already has this region with a certain depth, does not need to mark their cheeks any further, or, if they want, mark them very subtly.
Discover: Makeup mistakes that make your face fat
More: The best makeup tricks
Harmonizing
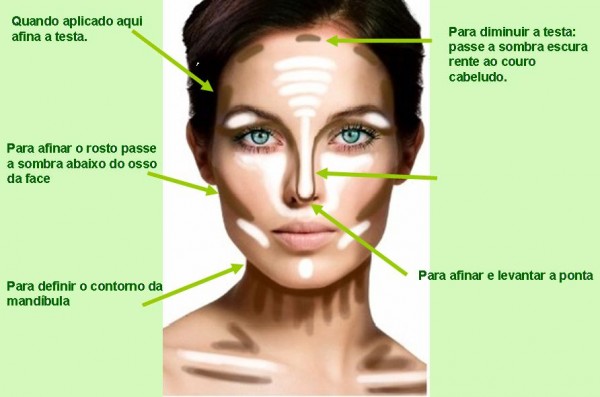
Now is the time to balance your look, so the second marking will be on the forehead. In this case, this effect is ideal for those with a very long face. The lines should be made at the temples, very close to the hair roots.
(Info)If you have a very short forehead, you should skip this step, so as not to end up making your face too small.(/Info)
Tuning the Nose
Every woman wants to have a thin nose, which is why this nose design has become very famous. The tip is to exchange a very expensive plastic surgery for this makeup, which will also give you a thin nose, but without having to cut anything!
Just make two parallel and very straight lines with the dark base, always following the line of the holes in the nose and the beginning of the eyebrows, taking care not to apply it to the inner corners of the eyes or the eyebrow itself, the line should only be on the nose.
See: Makeup to slim your nose step by step
More: How to make your nose smaller without plastic surgery
Diva look

To finish the markings with the dark base, let’s mark the crease, this region so often mentioned by makeup artists. However, we must bear in mind that the bone in our eyes is different for each person. So, you need to feel your own face and see where it is. On this little bone, we will apply the darker base to give depth to the look.
But don’t worry, use little product and focus more on the outer corners, as it will then be blended to give a finish.
See: 5 new ways to use eyeshadow in makeup
More: Eyeshadow tips for brown eyes
But Volume

Okay, after the depth, it’s time for volume to complement the makeup, so now is the time for a light foundation, which should be applied to the top of the nose, higher up.
It is necessary to bear in mind that we are already working, at this point, with three tones, that of the skin itself, the darkest tone and the lightest tone. Note that it is, precisely, the contrast between them that will make the effect more incredible.
(Note) Those who have a more prominent nose, of course, do not need to lighten it, in this case, the tip is to just correct it with dark tones.(/Note)
Highlighted apples
The time has come to hide the dark circles, so let’s apply the light foundation in that area and on top of the cheekbones. In addition to hiding dark circles, this effect will also lift your face and look.
See: Learn how to hide dark circles with makeup
Visual leve
(ninja-inline id=9469)
Who doesn’t want to sport a light and carefree look? To do this, the tip is to highlight the center of the forehead with the lightest foundation. The effect is subtle, imperceptible to those who don’t know this makeup trick, but very powerful.
See: Foundation or concealer, which comes first?
Featured eyes

The time has come to finish that crease we made, so now just highlight the area just below the eyebrows, an area that should always be clear in makeup to enhance the shape of the face and the look.
(Info)At this point, those who have well-shaped eyebrow arches and out-of-place eyebrows win.(/Info)
General blurring
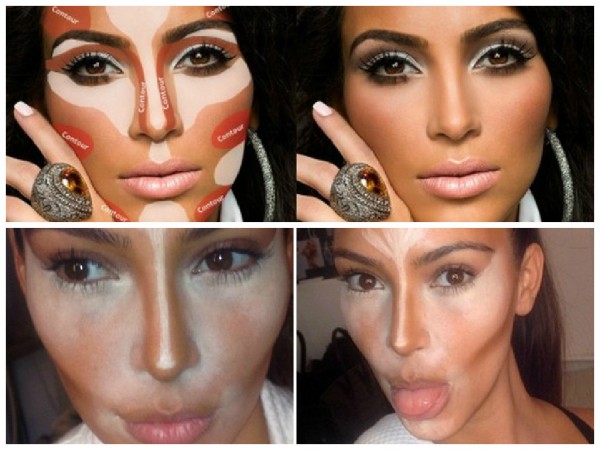
Did you mark everything, is it all crossed out? Then, it’s time to, with the help of a fiber optic brush or a sponge, thoroughly blend all the lines made, the light and dark ones, in circular movements.
Carefully, eliminate all marked lines between the color transition. We need to be able to see the difference in color and where each one is, but not understand where one begins and another ends.
The result is just the effect of this design, which will leave your skin beautiful and your face full of volume and depth.
See: Smoky eyes: find out how to get them
Finishing

Okay, now that you’ve achieved the desired effect, all that’s left to do is apply a little translucent powder to set and create your eye makeup.
The possibilities are many, from something more basic and for everyday life, like a brown smoky, for example, to something more for nighttime, like black, knowing that this skin preparation can be used for both daytime makeup. like at night.
The tip is not to put too much pressure on the technique if you are going to use it under the sun, the softer it is, the more natural the result will be.
If you liked the tips and want to learn how to create beautiful looks like this, I recommend the online makeup course with journalist, presenter and Beauty Guru, Juliana Goes.

Sign up for our newsletter and stay up to date with exclusive news
that can transform your routine!
Warning: Undefined array key "title" in /home/storelat/public_html/wp-content/plugins/link-whisper-premium/templates/frontend/related-posts.php on line 12
Warning: Undefined array key "title_tag" in /home/storelat/public_html/wp-content/plugins/link-whisper-premium/templates/frontend/related-posts.php on line 13