If there’s something that never goes out of style, it’s decorated nails.
Almost every woman has done it or wanted to do it one day.
See too: Decorated Nails 2015: Trends
There are many techniques and designs that make nail decoration simply incredible. And there are options for all tastes, from the most discreet to the most extravagant.
We have prepared a selection with beautiful images and pictures of decorated nails and, of course, step-by-step tutorials for you to practice at home or in your beauty salon.
See too: Learn how to make nails decorated with newspaper
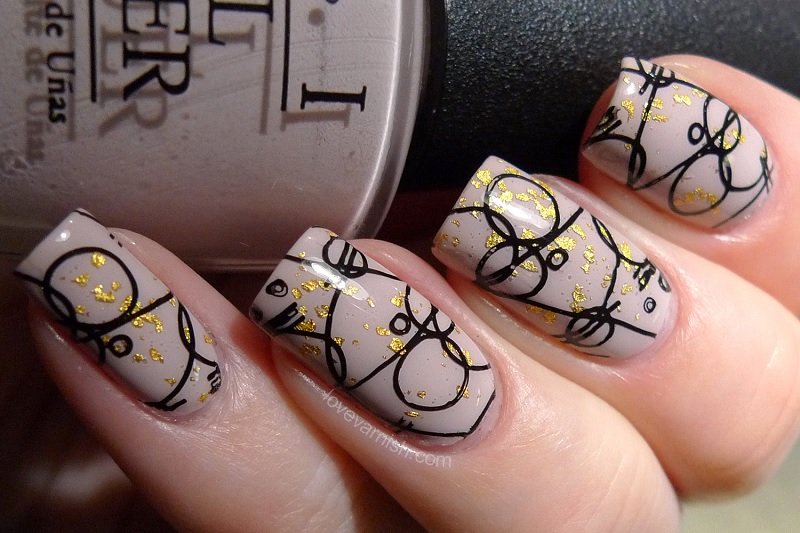
Photos of Decorated Nails


Caviar effect nails

Youre gonna need it:
-west,
-pliers,
-orange stick,
-golden nail art balls (you can find them in haberdashery stores, specialized stores, or even on the internet)
– nail polish of your choice
Nails decorated step by step
Caviar effect nail art Step by Step:

1 – Prepare the nail carefully, start by removing the cuticle with pliers and file the nails into your preferred shape, then apply a layer of strengthening base.
2 – Apply two layers of the chosen nail polish color, using the orange stick, remove excess nail polish on the sides;
3 – Apply another layer of the chosen nail polish on the nail where you will apply the caviar effect (be careful, you cannot let the nail polish dry!);
4 – With the nail polish still wet, carefully throw the balls;
5 – Press the balls with your fingertips, for better fixation, or, use the orange stick to leave them the way you prefer and that’s it!
Nail art: how to do nails with musical notes
Plush decorated nails

Also known as velvet nails, contrary to what it seems, they are very easy to do, and they are quick to apply. The only different material you will need to make velvet nails is the flocking powder that gives the velvet finish (it can be found in cosmetics stores and craft stores).
Nails decorated with flowers
Plush nails step by step:

1 – First, apply the nail polish normally, with one or two layers, however, do not apply more than two, otherwise the result may not be very good, in fact, this layer will only serve as a “background” for the plush nails, so It doesn’t need to be too perfect, then just clean the corners.
Nails decorated for carnival
2 – Then, apply a layer of extra shine, but without going too close to the cuticles, leaving a small space between the extra shine and the cuticles to facilitate cleaning and make the finish more well done.
Nails decorated with gold thread
3 – With the layer still wet, gradually sprinkle the “powder” onto the nail. Let it fall on the nail until it covers the entire painted area. We recommend doing this on a surface that makes it easier to collect the powder that will fall from your nail while you apply it.
Nails decorated with pepper
4 – Then, tap lightly so that the excess falls off or blow lightly to help with the process. To remove the hairs that remain on your finger, use a dry cotton pad. Be careful not to touch the cotton wool to the plush nails, as it will stick and be difficult to remove.
Nails decorated for the 2014 Cup
5 – Then just repeat this on all your nails, avoiding them hitting objects or getting them too wet and preventing them from rubbing against other things. This way, you will ensure that they last longer.
Nail Art: 6 models of decorated nails step by step
Two-color oval decorated nails

Youre gonna need it:
– west,
– pliers,
– orange tree stick,
– Scotch tape,
– 2 different shades of nail polish, e.g.: violet nail polish and antique pink nail polish.
3D nails step by step
Two-tone oval decorated nails Step by Step:
1 – Start by preparing your nail carefully: remove the cuticle with the pliers and file your nails into your preferred shape
2 – Apply a layer of strengthening base (strengthens and prevents yellowing)
3 – Apply two layers of violet nail polish.
4 – Make an oval design on the side of each nail with the pink nail polish.
5 – Finally, apply the extra shine of your choice to make the effect last much longer.

Sign up for our newsletter and stay up to date with exclusive news
that can transform your routine!
Warning: Undefined array key "title" in /home/storelat/public_html/wp-content/plugins/link-whisper-premium/templates/frontend/related-posts.php on line 12
Warning: Undefined array key "title_tag" in /home/storelat/public_html/wp-content/plugins/link-whisper-premium/templates/frontend/related-posts.php on line 13