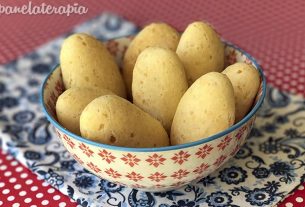
A bread that surprises with its ease, simplicity and is really delicious. And it happened to be vegan and there is no wheat flour in it.
Even though I don’t like naming my recipes with these decoys gluten free and vegan, I end up adding them to make them easier to find when looking for recipes in this vein. In addition to helping the big robots Oracle understand what the recipe is about. That being said…
It’s a recipe that I had no faith in, nothing, zero. It’s too simple, without any out-of-this-world ingredients. I bet you have them all in your house right now. Too good to be true, right?
It’s not a new recipe, the method is very common in Asia for obvious reasons (rice). But this particular version kind of went viral on TikTok and Instagram a while ago (the main reference is George Lee, instagram.com/chez.jorge) and ended up on YouTube. There are several videos of this recipe and I decided to test it to see if it would work in Brazilian reality.
National blender
Despite being super simple, foreign recipes call for a portable appliance which for us in Tupiniquin lands is a little more complicated: a really good blender. Out there, practically all recipes use the famous Vitamix which is a dream come true, but it doesn’t sell in Brazil officially. And when we find it through third parties, can cost almost a car. In time, even in the United States it is expensive for the standard there, however, it is payable.
Therefore, I wanted to put it to the test: Will it work with a domestic domestic blender? And in this case, I’m talking about my blender, which is already very vintage (read old and on its last legs). He struggles to make a cake, for example.
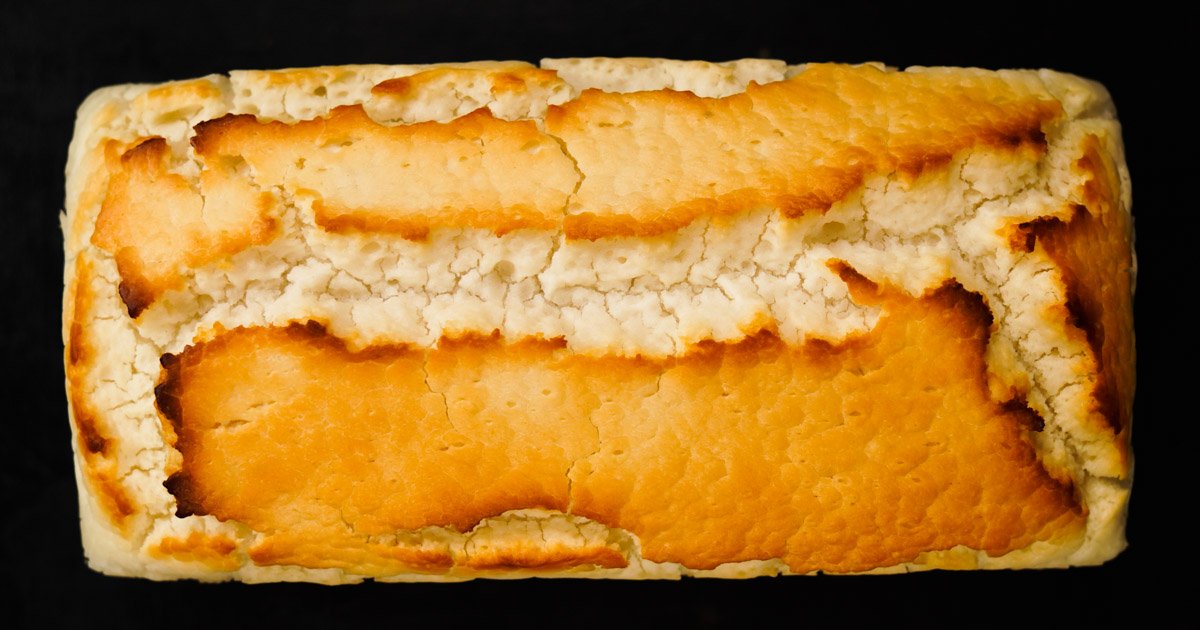
Oh yes. It’s bread blended in a blender. I know, I know… I would be the first to turn my nose up at bread like this. After all, bread needs to be rescuing e not beaten. But the big detail here, as it doesn’t use wheat flour, There is no gluten to be developed. But on the contrary, we have rice to turn into flour.
Wheat flour comes out, raw rice goes in
As you can see from the list of ingredients, it is used normal raw rice (polished long grain). This is the same for everyday use, which is why you need a blender that can blend the rice until it is well pulverized. And the second reason: you need warm up.
Not that it is actually necessary to have a thermal element in the blender to heat it up (there are blenders that actually heat up as a function). But just for the sake of physics, the friction generated by the blades and the food turns into heat (Thermal energy).
And this heat is necessary for fermentation, as biological yeast is used like traditional bread. It works like an instant greenhouse.
Rice bread worth it
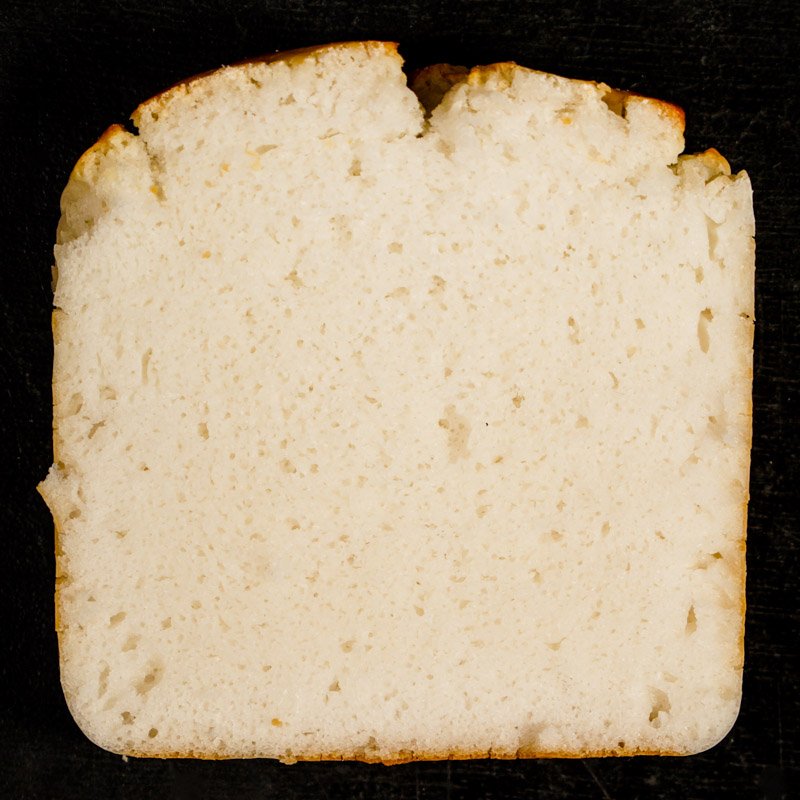
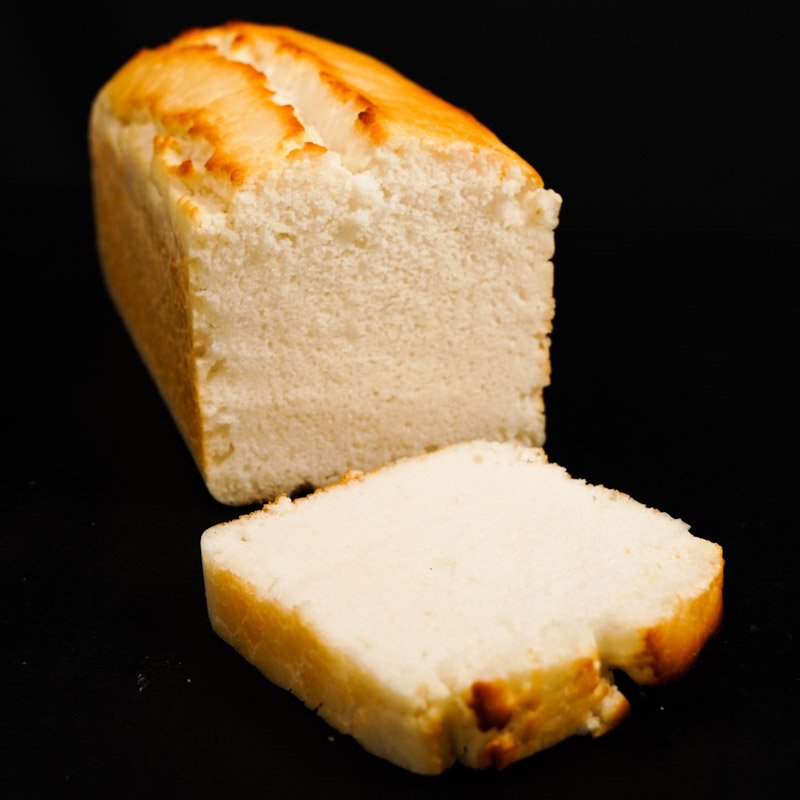
During tests to make the recipe even easier, I was quite surprised: it’s a really delicious bread considering the method. There’s a texture and flavor close to traditionalOf course, the texture it’s not completely the same. After all, we don’t have gluten which is responsible for this and best of all: It doesn’t have a cakey texture, which is what happens in many gluten-free breads.. I would venture to say that it reminds me of sliced bread, the very simple kind, you know?
I managed to make the bread in a regular home blender, however: the equipment may break in half. It’s a very viscous mass (although it’s soft) and considering the mixing time required, the simplest and least powerful blenders won’t be able to handle it.
A time difference is considerable. In my regular blender (which was no longer in its best days) it took about 5 minutes (needing to take a break in the middle to avoid burning). And I also tested it on a more powerful (and new) blender: it took less than 2 minutes to reach a temperature of 40ºC, and without any signs of stress.
Although I really liked it, there are some caveats: it’s a bread that doesn’t age very well, is best consumed within 2-3 days. Over time, it becomes drier and the texture changes a lot. It’s not bad, but it makes a difference.
Tips for Rice Bread
- I do not recommend using brown rice. During the test, the bread did not have the same structure and texture, to the point of not maintaining its shape. Probably, the presence of the peel and bran interferes with these points.
- I don’t recommend using rice flourthe amount of water required leaves the bread with a gummy texture and is less than it could be.
- I do not recommend using warm or hot water. It can kill the yeast due to excessive heat, the mixing process will heat up the dough. And the beating time is also necessary to spray the riceIf you beat less, the rice will still be grainy.
- Do not add more water than indicated in the recipe, the dough will be softer and you can wilt when roasting.
- It goes a lot even yeastand yes, you can feel the characteristic yeast flavor. I particularly like it, it helps to indicate in the sensory that it is bread. Quantity is also important so that the fermentation is faster. You could even reduce it, but the fermentation time will be longer.
- To bake it, I recommend lining the pan with non-stick paper. not regular parchment paper. The non-stick version actually has a non-stick coating that makes the bread come out. It will stick to regular parchment paper and you will lose bread.
- Technically, you could even grease the pan with semi-solid fat (butter, culinary margarine or vegetable fat). But still runs the risk of sticking and depending on its shape, the non-stick coating may come off together with excess bread.
- Is it possible to do in normal home blender, however: go take longer and can reduce the useful life of your equipment. When using a home blender, the beating time was 5 minutes at medium-high speed until reaching a temperature of 40ºC, with a stop in the middle to help beat and guide the dough to form the vortex during.
- The fermentation time is a suggestion: on hot days it will ferment fasteron cold days it will ferment slower.
- I didn’t let it ferment too muchdepending on the height of your shape, you should still leave a border of the sample shape. If it ferments too muchthe bread will deflate in the middle.
- It is a neutral and subtle bread, it’s not sweet. After all, there are almost 500g of rice for 30g of sugar, making it impossible to make it sweet. And the same goes for salt. You can eat it plain (I particularly taste it), but with jam, butter or some paste it is very tasty.
- I haven’t tested it with additions (other grains or nuts), I believe it would work. I would add it after the beating time, but it is important remember that it is a soft dough. If the added ingredient is heavy, it will sink to the base of the bread.
Rice Bread (gluten-free and vegan)
Makes: 10 slices (1 loaf measuring 22 x 10 x 9 cm)
- 450 g White rice (raw, polished long grain, needle)
- 300 g water (room temperature 25-30℃)
- 60 g vegetable oil
- 30 g crystal Sugar
- 10 g instant dry yeast (see note)
- 9 g refined salt
1 cup: 250mL | 1 tablespoon: 15mL.
- Wash the rice only once to remove large particles, drain well.
- Cover the washed rice with drinking water, it should be completely submerged. Cover with plastic wrap or a lid, and let it rest for at least 2 hours.
- Line a rectangular pan measuring approximately 22 x 10 x 9 cm with non-stick paper (see note), set aside.
- Drain the hydrated rice and weigh. It should have absorbed around 120g of water. If you absorbed more (more than 30g), reduce the difference in water indicated in the recipe.
- Blend rice, water, oil, sugar, salt and yeast in a blender until the dough reaches 40ºC and yes, you need to measure the temperature. The time may vary depending on your equipment, generally between 2-5 minutes. If your blender is not very powerful, blend slowly rather than all at once. Despite being viscous, it is a soft dough.
- Transfer the dough to the prepared pan and let rest for 15-20 minutes or until doubled in size. It will depend on the ambient temperature, if you live in a warmer place it will be faster. What if the temperature of the dough reached 40ºC.
- Preheat the oven to 180ºC while the dough ferments.
- Place the pan on another low baking tray.
- Bake at 180ºC for 40-45 minutes or until the top is golden. Depending on your oven, you may need to turn the pan in the last 5 minutes for more even browning.
- Remove from the oven and immediately unmold by removing the non-stick paper, leave to cool on a wire rack.
- Rice: In the test I used Camil brand rice, I believe that any brand should work in a similar way.
- Integral rice: I don’t recommend using it, it didn’t work.
- Rice flour: I don’t recommend it, the water variation is very large.
- Biological yeast: I used the dry one and didn’t test it with the fresh one, as I prefer to use the dry one. In all tests I used Dr. Oetker which, for me, is stronger-active faster even on colder days.
- Non-stick paper: it’s a type of baking paper, not this common one. The regular one without non-stick treatment sticks, but it sticks to the dough with all its might, don’t use the regular one, really. In the tests I used Dover Assa+Leve paper.
- Non-stick pan: I also tested it and it was right and wrong. Depending on the non-stick treatment of the pan, it works. In one of the non-stick pans greased with oil, the bread came out… but it took part of the non-stick treatment with it. And in another test using culinary margarine, it unmolded normally. My suggestion: use non-stick paper.
- Baking tray: in the recipe I recommend placing the bread pan on another baking tray, this modulates the temperature at the bottom better. Without this pan, the base will bake too much.
Portion: 100g | Calories: 232kcal (12%) | Carbohydrates: 39g (13%) | Protein: 4g (8%) | Fat: 6g (9%) | Saturated fat: 1g (6%) | Polyunsaturated Fat: 2g | Monosaturated Fat: 4g | Trans fat: 0g | Sodium: 353mg (15%) | Potassium: 61mg (2%) | Fiber: 1g (4%) | Sugar: 3g (3%) | Vitamin B2: 0mg (6%) | Vitamin C: 0mg | Calcium: 14mg (1%) | Ferro: 0mg (2%)

Sign up for our newsletter and stay up to date with exclusive news
that can transform your routine!
Warning: Undefined array key "title" in /home/storelat/public_html/wp-content/plugins/link-whisper-premium/templates/frontend/related-posts.php on line 12
Warning: Undefined array key "title_tag" in /home/storelat/public_html/wp-content/plugins/link-whisper-premium/templates/frontend/related-posts.php on line 13