A very common tradition abroad is to make gingerbread house (spicy biscuit). Something I always took that look at, but I wanted something different in this joke.
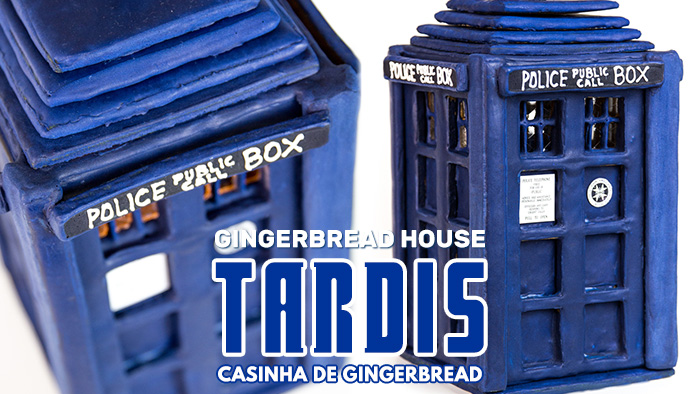
And this moment came when I saw a TARDIS made like this. If we search the interwebs, outside until you can find it. But it’s one of those things I didn’t even think about. The snap came because of our azamiga Paula Cookie (The Cookie Shop) made one of these last year as a package and I stayed in the greed to try.
But since I had a little past this time to make the little houses, I left for this year! Instead of a house, I have a espaço-navespace-nave!
For those who don’t understand anything, let’s go!
TARDIS (Time and Relative Dimension In Space) is a sentient space-wild within the Doctor Who universe, a series produced by the BBC, which is the DoctorDoctor’s vehicle in his adventures through spacetime. Oh, yes: the Doctor is an alien from the planet Galiffrey who has a great appreciation for the human race.
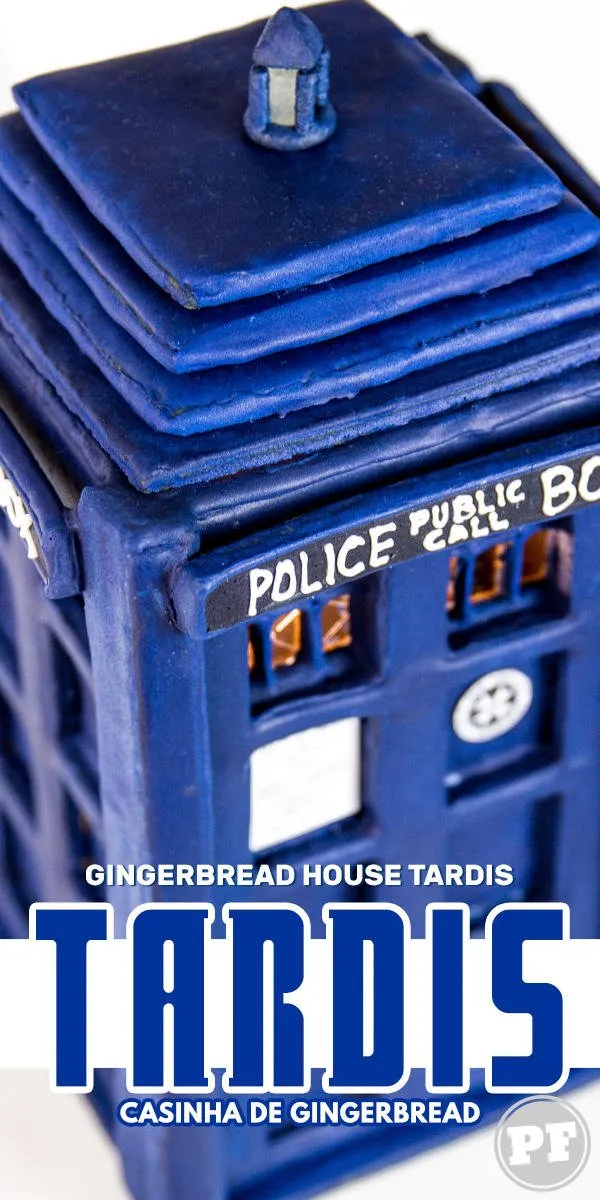
The TARDIS has several skills and one of them is the Chameleon Circuit that changes its exterior to go unnoticed when it materializes. Therefore, the ship appears to be a Police Box that really exists in British culture, in general, it was a telephone point to call the police.
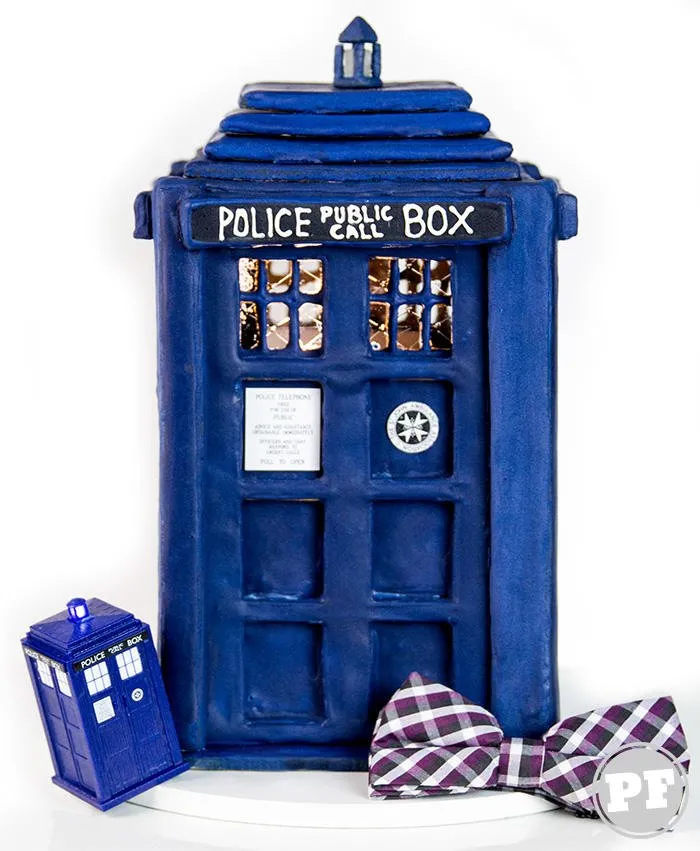
I think by then I must have realized that I really like the show. To have dedicated myself to this project, this is kind of obvious, right? “Ill with you to the “Ill of the… “Ill of the… “Ill of the… “
The project is all edible: gingerbread mass and real icing. Now whether or not one should eat is the big question. Why? Why??
The mass no matter how much in the gingerbread style is a version for construction, that is, it is a little different from the traditional biscuit. It is firmer and more stable to endure the assembly process. It is something to last longer than the ephemerality of the biscuit.
Originally, I would use this recipe for ginger biscuit. But during planning, Stella Parks (Brave Tart and Serious Eats) posted one I used as a basis: Construction Gingerbread Recipe.
There was adaptation, because some ingredients in the original we do not have here. Similar, but equal not. But I think it was very close and I managed to put together my version of house.
Speaking of it, I sought to get the closest to a real scale. What do you mean? There are more skilled people in this world who really make the TARDIS as a physical item. And they created the TARDIS Builders where there are projects and measures.
My model is 22cm tall and 15cm wide. It’s big. It could be smaller, but since I would do it… if you want to venture out: Molde Tardis.
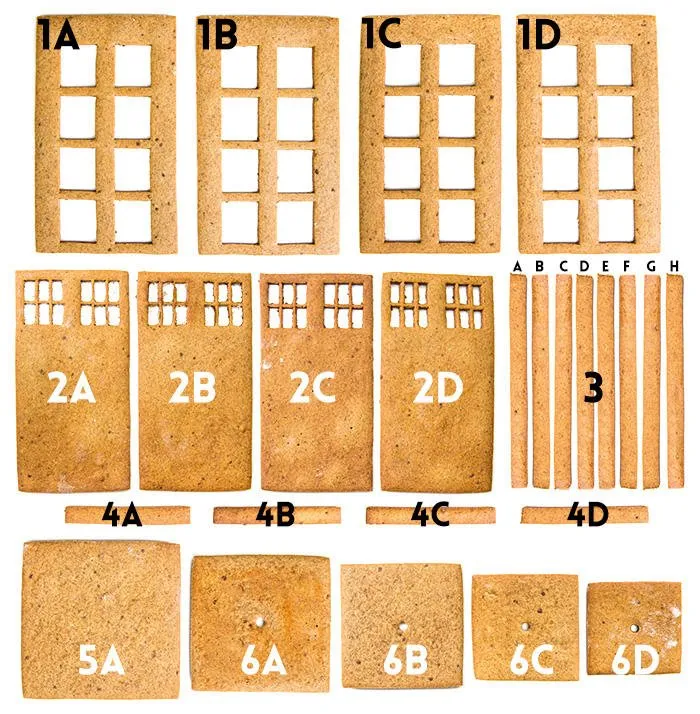
In the photo below shows the pieces needed to assemble the TARDIS.
I believe that the text and video are very didactic. Shall we do it? Allons-y! “Ill with you to the “a ” & . . “””””
TARDIS: Bisinha de Biscoito
Pre-preparalloir: 20 minutesminutos
Preparing Time: 2 days 12 hourshoras
Total: 2 days dias12 hours horashours 20 minutes minutes
It yields: 1 house of 22x14cm
Ingredients: MASS GINGERBREAD (Aquanger for ONE)
- 45 g unsalted butter (ambient temperature)
- 50 g crystal sugar
- 10 g brown sugar
- 06 g cinnamon powder (about 2 c.cha)
- 2.5 g ginger powder (about 1-1/2 c.cha)
- 1 g clove powder (about 1/4 c.cha)
- 0.5 g refined salt (less than 1/8 c.a.
- 07 mL extract of vanilla (or 1-2mL essence)
- 115 g corn syrup (see observation)
- 177 g wheat flour
Ingredients: GLAC REAL
- 700 g mixture for real icing
- 01 navy blue dye gel (see observation)
- 01 blue anis gel colorant
- 01 denim blue dye gel
- 01 violet dye gel
- Black dye in gel
Ingredients: JANELAS
- 120 g isomalte
- 2 gelatin
Use the quantities inunits of measurements by weight and volumewhen you are present. The measures incups / harvestersare just onecourtesy of the systemand e e less precise. . .
1 cup: 250mL | 1 tablespoon: 15mL.
Mode: MASSA GINGERBREAD
- The molds must already be cut and ready for use. I recommend printing on paper with weight of 90g/m2. If you haven’t caught: Molde Tardis.
- Flour the oven at 180oC. Forse baking sheets with parchment paper and sprinkle wheat flour. Or use silpat (silicone suit). If you use parch butter for baking: put plenty of flour on the paper, if it will not stick.
- In the bowl of the mixer add butter, sugars, spices and salt, vanilla and glucose prepared. Beat at medium speed until it becomes very homogeneous cream, it is liquid even.
- Add the flour and beat just enough to form a uniform dough.
- Transfer to a surface and kneed to form a square. If it is very hot, put in a plastic bag and light in the refrigerator for 10 minutes.
- The thickness of the mass should not pass 0.5cm. Ideal that is between 0.4-0.5cm.
- To open the dough use paper butter or silpat to help carry the dough. She is very malleable. Flour will be required not to stick the roller and ruler.
- I prefer to open the dough and take the freezer until it is easier to cut and the dough deforms less. However, if you do this, the butter paper will absorb moisture and when baking, it will stick to the dough of the gingerbread. So the butter paper of baking and the transport paper cannot be the same.
- A recipe of the dough is sufficient for two outer sides and 3-4 side edges. An open mass produces a rectangle of about 38x27cm. For a whole Tardis is required: 04 recipes right in the letter. I suggest you make 4 1/2 revenue per guarantee. But I made it by parts: 02 recipes together and then 2 and 1/2 more recipes.
- Try to bake equal parts on the same baking sheet, smaller parts bake faster.
- The roofing parts have a hole in the center to allow light to pass through if it puts light inside the Tardis. It is not a necessary detail.
- Asser at 180oC for 25-30 minutes for large parts, the smaller ones around 15-20 minutes. There’s only a big color change when it passes the point. During cooking, the spice aroma is very present in the environment.
- Remove from the oven. The still warm pieces still soft, as they cool off they darken a lot. They will stand firm. Allow to cool on the baking sheet itself or on dry surface and as flat as possible.
- Parts need to be cold for decoration and assembly.
Mode: GLAC REAL
- Follow the manufacturer’s instructions for the amount of water and time of hitting the mixer.
- With the icing ready, it is in icing point cement (well firm). Before dyeing, book about 25g white frosting to write the details of the plates (Police Box).
- Add the dyes until you reach the blue hue closest to the Tardis. It was necessary a lot of dye, I started with anise blue and adding the blue jeans, violet and marine. Black is to darken the shade of blue that was very clear. Due to the amount of dye, the point of the icing changes. He remains firm, but less than when he finishes beating.
- I adjusted the fluidity by adding more water after dyeing the glaze. The change in consistency I did per parts, took out a quantity (about 90-100g) added more water and used it. And when it was over, I was doing the same process again. It is easier to put water than to remove. Keep the main icing covered with damp cloth and plastic so as not to dry.
- The black icing is to make the bottom of the plates (Police Box), for this, separate a small amount of the blue icing (20-25g) that will be left after covering the pieces and add more black dye. Using blue icing as a base it is easier to hit the shade of black. Since it is filling icing, it can be more fluid.
- I transferred the blue icing to the mango from confection with flat beak (number 3), white icing for details was biso smooth (number 1S). Keep the nozzles covered with wet napkin.
- The ideal is always to make the amount of icing that is used and if you need to do more, because the icing separates with the passing time. However, as this is dyed with a very specific shade of blue being able to reach the same color at different times it is difficult. The icing that is left to stick the parts, if kept packed and in a humid environment has a longer service life.
Mode: COVERING WITH GLAC
- You must have the following pieces: 04 external panels with 08 cut windows; 04 internal panels with 02 cut windows (divided into 06/each); 08 edge strips; 04 police plates (+04 fill plates if desired); 01 base; 03 different size frames for the roof. With the leftovers of mass I tried to build a lamp for the roof.
- To cover all the pieces with the blue icing is required about 500g. The amount left over, store in a container with covered cover with wet paper and plastic, or inside a well-closed confectionery sleeve. This leftover must have a firm consistency and will be used to stick the pieces, as I mentioned earlier: adjust the fluidity gradually and not the icing all at once.
- The consistency of icing depends on work and personal preference. To expedite, I use a unique consistency both to make the boundary of the edge and the fill. It is semi-firm, but very malleable to be spread. Other people like a firmer icing for contour and another more fluid for filling.
- The order of decoration was: external panels, internal panels (see the topic of Windows), edge strips, roof squares, base, police plates.
- Internal panels do not need to be filled completely, only where they will be seen by the windows of the external panel. In addition to space being needed to be able to paste later on the outer panel. To get an idea of where to pass the icing, park the pieces using the mold used to cut the outer panel.
- Plate police was used firmer icing to make the outline, to serve as a blue border, since the inner fill is black. Make the outline and wait 10 minutes, then fill it. The plate sayings (Police, Public Call, Box) should be made when the piece is dry.
- Try to spread a more even layer possible and smooth. Give light shakes on the pieces (Might BEM) to level, and note to find bubbles, if you have, burst with wooden toothpick. Do this with frosting still damp.
- The thicknesses of the edge strip, base, roof and plate police pieces were covered after the surface was dry. It doesn’t have to be a thick layer is just to hide the gingerbread color.
- The parts need to dry completely before making the final assembly, about 7-12h, if the weather is damp may be needed more time. As you have to manipulate it a lot, if it is not dry when it is insured it will break the icing.
- To stick the inner panel on the outside must be dry and with the windows ready. And it must already be united and dry for the final assembly as well.
Mode: JANELAS
- There are 3 ways to do it: with isomalte, gelatin leaf and parchment paper. Here I show the first two.
- The inner piece for isomalam should not have the blue icing yet. For gelatin sheet and parchment paper should already have dry blue glaze.
- Isomeorate is a type of “alcohol sugar” is derived from sucrose. It is widely used in “sweet sugarless” sweets and for sugar sculptures due to its resistance when crystallization and water absorption. Each window uses about 10g, the sugar should be heated (stove or microwaves) until it becomes liquid. The general rule is that it must reach 168oC, however, as the amount is little it caramelizes before that. The visual aspect is liquid and transparent, at the beginning of the physical state change, it becomes slightly opaque and then transparent. If it starts to turn yellow, it’s because it’s passing the point. Be very, but very careful. It gets extremely hot and caramel burn is one of the worst. Wear gloves to protect yourself. Cut a piece of foil that covers the leaked windows, grease with butter and put the piece. Place the isomalk in the leaked windows and don’t touch it. If you get slimy, heat up quickly again. Let it cool and harden, about 20 minutes.
- For gelatin or parchment paper are glued to the back of the piece using the actual icing. Use little amount and as soon as you finish, turn the pieces over again so that the weight of it keeps the gelatin or paper in place.
Mode: MONTITING – PANELS
- For this step, the icing on the panels need to be dry.
- The external and internal panels need to be glued to create the illusion of the windows. For this, it is enough to pass firm frost on the internal panel, position the external over.
- To make firmer, pass more frost on the side edges of the inner panel.
- Letting dry with the outer panel facing up, its weight will help to keep in place.
- For the final assembly, this union must be dry.
Mode: MOUNTING
- For this stage all the parts need to be dry and with the windows made.
- The panels are joined two by the edges. As it has the thickness, it is there that the union is made. Pass firm frosting on the inside. As the panels have the internal panel, when joining them, a gap is formed in which it is possible to fill with icing.
- If you have an object that lines a right angle knatto (square phaned) use to help align. At this point, the pieces should be able to stand alone.
- Wait to dry for 20-30 minutes.
- Unite the two halves in the same way, passing icing on the inside and at least on the external.
- To form the box as a square, the union must be alternately made the fitting of the panels, as shown. Otherwise, it becomes a rectangle because of the thickness.
- Wait to dry completely to place the edges, about 7h.
- The edges are made with two strips to form a corner. One of them will cover the union of the panels and the other the thickness of the edge itself. Passing glaze and leaving as aligned as possible.
- To leave with a unique finish, it is possible to pass icing again.
- At the top of the box will still appear the mass of the gingerbread, then icing through forming a very uniform layer.
- Wait to dry to put the base, about 8h.
- For the base, just position the box on the base, and pass icing in the inner part where they make contact.
FINAL CONSIDERATIONS
- When turning a 2D into 3D design remember to consider the thickness of the parts. So the edges were a little different and the base got smaller than it had planned.
- They told me in the middle of the way: large pieces (above 16cm) covered with real icing tend to bevering when drying. Some type of pull/contraction happens during water evaporation.
- The thickness on the edges of the windows were covered after the Tardis assembled. It didn’t do that much work, but I think they could be covered before.
- Adapted : Construction Gingerbread, TARDIS Builders and Gingerbread TARDIS.
- Corn syrup: the best known is Karo, but has other brands. I used it from Yoki. Karo, I don’t see so much in my area. Not to be confused with transparent liquid glucose syrup. Both are made with corn, but the composition and concentration of sugars are different, in addition to the amount of water and viscosity.
- Mix for real frosting : I used the Mix. It is possible to make at home, but I preferred to use the mixture by practicality and not have to buy more ingredients. When I did it at home, I bought clear powder and wasted a lot.
- Gel dyes: were all new and unused Mix brand. The colors anis, jeans, violet and black were 15g pots, already marine was 25g. The anis, jeans and marine were almost everything.
- Moisture: the parts tend to absorb moisture from the environment, if it happens, take again to the furnace at low temperature to dry. After almost month ready, she still suffers interference from moisture, the “Police Box” plates curved a little.
The recipe has links to affiliate program, if bought, PratoFundo can receive a commission on the sale that helps keep the site on the air.
Nutritional info is only courtesy of the system and generated automatically; they may not reflect the nutritional reality of the recipe.
KEYWORD: biscuit house, american confectionery, cookies

Sign up for our newsletter and stay up to date with exclusive news
that can transform your routine!
Warning: Undefined array key "title" in /home/storelat/public_html/wp-content/plugins/link-whisper-premium/templates/frontend/related-posts.php on line 12
Warning: Undefined array key "title_tag" in /home/storelat/public_html/wp-content/plugins/link-whisper-premium/templates/frontend/related-posts.php on line 13