When I first moved into my mobile home, I was excited about the freedom and simplicity it promised. However, one of the first things I noticed was the limitations of my outdoor water faucet setup. As an avid gardener and outdoor enthusiast, having a reliable and efficient water source was essential. If you find yourself in a similar situation, let me guide you through the process of upgrading your mobile home outside water faucet and share some invaluable DIY tips and tricks I’ve learned along the way.
Understanding the Importance of an Efficient Outdoor Water Faucet
Before diving into the DIY upgrades, it’s crucial to understand why having a functional outdoor water faucet is vital. A reliable outdoor water source can drastically improve your quality of life, especially in a mobile home setting where space is often limited. Here are a few key reasons why you should consider upgrading your setup:
- Convenience: An efficient outdoor faucet allows for easy access to water for gardening, washing your car, or filling up a kiddie pool.
- Water Conservation: Modern faucets can help reduce water waste with improved flow control and features like timers.
- Enhanced Functionality: Upgrading your faucet can accommodate various attachments, such as hoses, sprinklers, and pressure washers.
- Increased Property Value: A well-maintained outdoor water source can enhance the appeal of your mobile home.
Assessing Your Current Setup
Before making any changes, it’s essential to assess your current outdoor water faucet setup. This evaluation will help you identify any issues and determine what upgrades are necessary. Here are some factors to consider:
- Water Pressure: Check if the water pressure is adequate for your needs. Low water pressure can hinder your ability to use hoses or irrigation systems effectively.
- Faucet Condition: Inspect your faucet for leaks, corrosion, or other signs of wear. If your faucet is old and rusty, it might be time for a replacement.
- Accessibility: Ensure that the faucet is easily accessible. If it’s tucked away or hard to reach, consider relocating it or installing an additional faucet.
Choosing the Right Faucet for Your Mobile Home
Once you’ve assessed your current setup, it’s time to select the perfect outdoor faucet for your mobile home. Here are a few options to consider:
- Standard Hose Bib: A simple and affordable option, ideal for basic garden use.
- Frost-Free Faucet: This type prevents freezing in colder climates, making it a reliable choice for year-round use.
- Wall-Mounted Faucet: Great for limited space, these faucets attach directly to the wall and can be used with hoses and other attachments.
- Smart Faucets: For tech enthusiasts, smart faucets can be controlled via smartphone apps, allowing for enhanced water management.
DIY Installation: Step-by-Step Guide
Now that you’ve chosen your new faucet, it’s time for the fun part—installation! I’ll walk you through a simple DIY installation process that you can tackle with just a few tools.
Tools and Materials You’ll Need
- New outdoor faucet
- Adjustable wrench
- Pipe wrench
- Plumber’s tape
- Bucket (to catch any water)
- Safety goggles
Step 1: Shut Off Water Supply
Before you start, make sure to shut off the water supply to your outdoor faucet. This will prevent any unexpected splashes or water damage during the installation process.
Step 2: Remove the Old Faucet
Using the adjustable wrench, unscrew the old faucet from the plumbing. Be sure to catch any water that may still be in the pipes with your bucket.
Step 3: Prepare the New Faucet
Wrap plumber’s tape around the threads of the new faucet to ensure a tight seal. This step is crucial for preventing leaks.
Step 4: Install the New Faucet
Attach the new faucet to the plumbing and tighten it with the adjustable wrench. Be careful not to overtighten, as this can damage the connections.
Step 5: Turn On Water Supply and Check for Leaks
Once everything is connected, turn the water supply back on and check for any leaks. If you notice any, tighten the connections further or reapply plumber’s tape as needed.
Enhancing Your Outdoor Water Faucet Experience
Now that you’ve successfully installed your new faucet, let’s explore some enhancements that can make your outdoor water experience even better.
Consider Adding a Hose Reel
A hose reel not only keeps your hoses organized but also prevents tangles and kinks. There are many stylish and functional options available, including wall-mounted and portable models.
Install a Timer for Watering
If you have a garden, consider installing a timer on your outdoor faucet. This feature allows you to set specific watering schedules, ensuring your plants receive consistent hydration without the guesswork.
Use a Pressure Regulator
If you live in an area with high water pressure, installing a pressure regulator can help protect your hoses and tools from damage while optimizing water usage.
Real-Life Case Study: My Own Upgrade Journey
When I decided to upgrade my outdoor faucet, I was initially overwhelmed by the options and tasks ahead. I opted for a frost-free faucet to ensure I could use it year-round, regardless of the weather. After carefully following the installation steps, I was thrilled to find that not only did my water pressure improve, but I also saved water thanks to the improved efficiency of the new faucet.
Additionally, I installed a hose reel to keep my garden area tidy, and added a timer to ensure my plants were watered even on busy days. The transformation was remarkable, and I couldn’t be happier with the results!
Common Mistakes to Avoid
As with any DIY project, there are common pitfalls to watch out for. Here are some mistakes I learned to avoid:
- Not Shutting Off Water Supply: Always remember to shut off the water supply before starting any work.
- Ignoring Water Pressure: Failing to check water pressure can lead to issues later on. Make sure your new faucet can handle your water pressure levels.
- Neglecting Seals: Always use plumber’s tape on threaded connections to prevent leaks.
- Skipping Maintenance: Regularly check your faucet and hoses for wear and tear to prevent future problems.
Frequently Asked Questions (FAQ)
1. How do I know if my outdoor faucet is frost-free?
A frost-free faucet typically has a longer stem that extends into the home, preventing water from freezing in the pipe. To confirm, check the manufacturer’s specifications or consult a plumbing professional.
2. What is the best material for an outdoor faucet?
Brass is generally considered the best material due to its durability and resistance to corrosion. Stainless steel is also a good option but may be more expensive.
3. How can I prevent my outdoor faucet from freezing in winter?
To prevent freezing, you can install a frost-free faucet, detach hoses during winter, and insulate exposed pipes with foam or insulation tape.
4. What should I do if my faucet leaks after installation?
If you notice leaks, first check the connections and tighten them as needed. If leaks persist, you may need to reapply plumber’s tape or replace the faucet altogether.
Conclusion
Upgrading your mobile home outside water faucet is a rewarding project that can significantly enhance your outdoor experience. With the right tools, materials, and a bit of patience, you can transform your setup from functional to fabulous. Remember to assess your current setup, choose the right faucet, and follow the installation steps carefully. Incorporating additional features, like a hose reel and timer, can further optimize your outdoor water usage.
As I reflect on my own upgrade journey, I encourage you to take the plunge and make these improvements. Not only will you enjoy the convenience of a better outdoor water source, but you’ll also add value to your mobile home and make your outdoor activities more enjoyable.
Don’t forget to sign up for our newsletter for more DIY tips and tricks, and share this article with friends and on social media to inspire others to upgrade their outdoor setups! Happy upgrading!
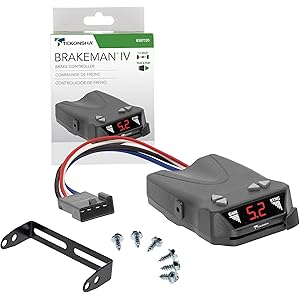
Tekonsha 8507120 Brakeman IV, Time-Delay Brake Controller For Trailers with 1-4 Axles, Compatible with Ford, GM, Chevy, Dodge, RAM, Toyota, Jeep. Wiring harness sold separately.
$79.99 (as of November 15, 2025 07:52 GMT -03:00 - More infoProduct prices and availability are accurate as of the date/time indicated and are subject to change. Any price and availability information displayed on [relevant Amazon Site(s), as applicable] at the time of purchase will apply to the purchase of this product.)
Sign up for our newsletter and stay up to date with exclusive news
that can transform your routine!


